Wednesday, May 30, 2012

Jailbreak the New iPad (iOS5.1.1) in 10 minutes

I followed steps on iphonehacks jailbreak my new iPad. It is pretty easy and safe. The same steps can also jailbreak iPad2 (including iPad2,4)and iPad1 which runs on iOS 5.1.1.

Before you start jailbreak, you need to do the following to your iPad.
1. Make sure you upgrade the iOS of your iPad to 5.1.1

2. If you have Passcode turned on, disable it.

Here is the detail steps:
1. Download Absinthe Jaibreak tool Windows version or Mac version.
2. Unzip the download file absinthe-win-2.0.4.zip to any folder. This folder contains the following file.
3. Execute the absinthe-win-2.0.4.exe. It will extract to a new folder absinthe-win-2.0.4.
4. Right click on absinthe.exe and select Run as administrator.
5. The Absinthe tool windows is displayed. Plugin in your iPad to the computer and the tool will show the iPad is detected. Click on "Jailbreak" button.


6. It will take about 5 to -10 minutes. You don't need to do anything. Just wait. Your iPad will automatically restart.
7. Once it is done, you should see the following message "Done, enjoy".  That's it! You iPad is jailbreak.

Note: If you did not see the "Done, enjoy" message, this means the jailbreak fails. Don't panic, it happens to me first time. Just re-plugin your iPad and do the above steps again. It works for me second time.

If you experience the Sandbox problem in Game Center or in-app Purchase, please visit my post on how to resolve:
How to fix the iPad Sandbox problem (This is not a Test User account error)


Friday, May 11, 2012

iPad Keyboard Tricks

Trick1: Lock Upper Case key
Want type lots of upper case letters? You can double click on the Shift key and it will keep locked. Click again will unlock it.


Trick2: Split keyboard
Sometimes use two thumbs is better than index fingers. Just slide the keyboard outwards using your fingers, you can split the keyboard which is easy for two thumbs to type.

Trick3: Move keyboard up and down
Press the keyboard button and move up and down.

Trick4: Insert period followed by a space by tab Space bar twice
Tired of finding the period key at the end of each sentence. You can double tapping Space bar instead. It will insert a period and followed by a space. Convenient!


Wednesday, May 9, 2012

Google Map for Android Provides Indoor Direction

Recent upgrade of Google Map Android provides a very useful function: Indoor Direction.

It is easy to use. Just like the normal navigation. But it can give your direction inside the build! This video will show you:

I think the indoor direction is very useful in the gigantic building like the hotels in Las Vegas.  But you need to have data plan there.

Monday, May 7, 2012

$16 for one year National Geographic subscription and free iPad HD digital version

Do you know that for CAD $16, you can subscribe to National Geographic magazine for one year (12 issues, $1.33 per issue)? Also, you can get the free iPad digital version for free (which cost $19.99 if subscribe from iPad). The iPad digital version is not static PDF, it is interactive. For example, you can rotate the 3D object using your finger.
A good news is after May 2012, the digital version of National Geographic supports the new iPad's retina display. This means it has stunning high display qualify.
Following is the steps how to get all these by CAD $16
First, click the following picture to subscribe, you need to provide your name, address, email and credit card information. Note that US order is USD $12, Canada order is CAD $16 ($17.22 after tax).

 Although the paper magazine takes 4 to 6 weeks to delivery, you can read the iPad digital version right now:
After you submit the the subscription, a email will send your email account which should contain the 10 digits account number.
If you have not install National Geographic app on your iPad, you can click on the following picture to install.
Once installed, it should be shown in the Newsstand.
One getting in, click on "Tap Here for Access to the Tablet Edition"
Fill in your account number, postal code and email address and then click on "Enter"
Next step asks you to enter a password. The user name is your email address.
Now you can sign in using your user name and password.
Now you are ready to download. The size of a issue can be 400MB. So it takes a while to download.
Enjoy!


Saturday, May 5, 2012

Difference between US and Canada Subaru Outback and Why I bought from US

Main reason: price. Following is the comparison between the US and Canada for the model (2.5 Limited) I want to buy.
Buy from US
You can get detail US model and package information from
 http://www.cars101.com/subaru/outback/outback2012.html.
It has more detail than the official Subaru website.
2012 Outback 2.5i Limited with Moon Roof Package(CDF-04)
US$30,014.00
Van Bortel price including freight and PZEV (Partial Zero Emission Vehicle)
Moon Roof Package includes: Power tilt/slide moon roof, back-up camera with display built into auto-dimming rear-view mirror w/ Homelink.


Accessories I added include:
US$46.00 Rear Cargo Net
US$62.00 Rear Bumper Cover
US$100.00 Splash Guards
US$371.00 Wheel Arch Moldings
US$50.00 Rubber Mats
US$356.00 Remote Engine Starter
--------------------------------------------
US$750.00 Canadian Export Surcharge (was $500 a year before and no such charge couple of years ago)
US$110.00 NY Fees
--------------------------------------------
US$31,859.00 TOTAL(Without Tax)
--------------------------------------------
Canada Tax (13%) 4141.67
--------------------------------------------
US$36000.67 TOTAL

Import to Canada also needs to pay around CAD$220 fee (RIV fee)

Note that Front underguard is included in US's package but not in Canada's package.

Buy from Canada
For similar configuration, following is the web price from subaru.ca:

US price:           USD  $36000.67
Canada price is: CAD $43674.16 (before negotiation, includes $1500 cash discount)

There are about $7600 difference.  Of course, the Canada price is before negotiation. But even you can reduce $3000 through negotiation, there is still have around $4000 difference.

Difference between US and Canada Model
The above configurations of US and Canada are similar but there are some differences:
1. Audio and Communications
US model uses Harman Kardon premium audio system with 4.3-inch display, subwoofer and 440-watt 9-speaker.
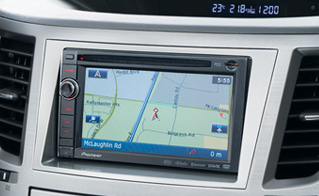
Canada model uses Pioneer AVIC - X9310BT in-dash navigation/audio system with colour touchscreen, smartphone integration and DVD playback. It only has 6-speakers.
Canada's model has GPS navigation and touch screen. But US model has more speaker (9 vs. 6) and subwoofer. The Pioneer system feel like after market.
For me, I prefer the Harman Kardon since I can spend 200 dollar to buy a better portable GPS with life time map update. I do not like the after market feeling of the Pioneer system. Interesting thing is that Canada model just switches to Pioneer system in 2012 model. Before, they use the same system as US.

2. PZEV package
Partial Zero Emission Vehicle package is not available for Canada's 2.5 limited model (only available for Convenience model).

For New York state, PZEV package is mandatory and costs US$300.
It is hard to say if this package is useful or not except making you think you are contributing to protect earth from global warming. Not sure if it will cause problem in the future if the  PZEV package has problem.

3. Unit Display.
US model's speedometer display both mile/hr and kilometer/hr but kilometer is in smaller font. Make sure don't take mile for kilometer since this is not a excuse for speeding.
Also, the ambient temperature, driving range, fuel economy (average and real time) are all in US unit (Fahrenheit, Mile, MPG). This can be be easily change to metrics unlike other model (Toyota provide a button to switch). So you need to get used to this.
For temperature, you can just remember several key points: 0C- 32F, 20C - 68F, 30C- 86F. 40C - 104F.
Also remember 1C is about 2F.

4. Color
For some unknown reason, the color combination is also different between US model and Canada model. For example, for exterior color of Satin White Pearl, US's interior is ivory but Canada's is black. I like Satin White Pearl with ivory interior. That's another reason I bought from US besides price.

5. Subaru Badge of ownership
For US model, you can order free badges from: http://www.subaru.com/enthusiasts/badge-of-ownership/index.html.
You can mail the badge to your friends in US or to a US border mail box like (http://cbiusa.com/).

Warranty
Warranty may be the biggest disadvantage for Canadian to buy from US. During the warranty period, you have to repair at Canadian Subaru dealer and then apply for a reimbursement from US Subaru. Detail information can be found at Canadian Warranty Coverage for US bought Vehicle.
For me, this is not a big deal due to two reasons: First, the chance of repair during the warranty period is small, considering Subaru is a pretty reliable vehicle. Second, I can still get the money back although needs to pay first.


Friday, May 4, 2012

Free for this weekend - iPad Game Star War Pit Droids


For this weekend (May 4 to 6) only, you can download the Star War Pit Droid game for free from iTune!
Click on the following icon to go to its iTune page.
I played a little. The first few levels are pretty simple. But it gets more tricky as you go on. Definitely worth to download, especially you are Star War fan.


Enjoy.

Thursday, May 3, 2012

How to Automatically Push Android Photos to Desktop

When iCloud is introduced, Apple brags about the Photo Stream Feature. Basically, the photos taken by iPhone can automatically appear on your other iOS device and Desktops (PC or Mac).

Actually, Google Android can achieve the same function through Google+ Instant Upload and Picasa Sync to Web.

Here is how to do that:
First, install Google+ on your Android phone .

Open Google+, Click on Photos, then press on Menu key and select Settings.
Check Turn on Instant Upload. You can also set when to upload photos (like WiFi only).

Now, every time you take a photo using your Android phone, the photo will be automatically uploaded to Google+ Instant Upload album.

To automatically push to photo from Google+ Instant Upload album to your PC or Mac, you need to install Google Picasa.
Open Picasa, Select File > Import from Google+ Photos.
Select Instant Upload Album to import
After import is finish, you can find the album under Instant Upload
Select the Instant Upload album, then switch the Sync to Web on.
You are done! The sync process may take a while.
The best part is: the changes you made to the photos (like add Caption, Comments) in Picasa will be automatically sync to Google+ Instant Upload Album too. The other way works too (Changes made in Google+ Instant Upload Album sync to Picasa).
If you do not want to wait the sync happens automatically, you can right click on Instant Upload album in your Picasa and select Online Actions > Refresh Online Status
If you want to have a look at where the photos are stored on your desktop, you can right click on the Instant Upload album and select Locate on Disk.


Wednesday, May 2, 2012

Finally: Desktop App for Amazon Cloud Drive

There are many exciting news recently from the major players of the cloud storage services. Microsoft SkyDrive provides Dropbox like Desktop App, Google introduces Google Drive, Dropbox provides new functions. Now it is turn for Amazon's Cloud Drive.
Install is pretty easy. After installation is finish, you just need to sign in.

Unlike Dropbox (SkyDrive, Google Drive and Apple iCloud), Cloud Drive Desktop App does not create local folder on your PC or Mac.

Instead, it only creates an icon on your task bar (all of the major players do). To upload file, you  can drag the file or a folder to the icon.

You can also right click on the file or foler and select Send to / Amazon Cloud Drive.

In my opinion, I still like the Dropbox style local folder. The Amzaon Desktop App only make upload files easier, but you can not organize the filer on your local file system like all other major players do. But anyway this is a big improvement from the Web interface only choice.


Tuesday, May 1, 2012

How to Take Screenshot on iOS and Android

Sometimes you finished a game level and want to take a screenshot and show off to your friends. If you are suing iPhone or iPad, it is easy. Just press and hold the Home button, then click the power button.
You will hear a Camera shutter sound and the screen will white out and then come back. The screenshot will be in your Camera Roll of the Photo app.
If you have iCloud enabled and have the iCloud client installed on your PC or Mac, the screenshot will automatically push to your PC or Mac through Photo Stream.

To take a screenshot on Android without third party software is different story. It is not for normal user. It is more like for developer. You need to download and install Android SDK on your PC first. Then enable USB debugging mode on your Android device and connect to PC and run DDMS application to do the screen capture.
Here is the link for the detail steps.
http://www.addictivetips.com/mobile/how-to-take-screenshots-of-android-device/

Now you should understand the difference between iOS device and Android device. One is for everyone, Another is for Geek.


Free Shipping + UP to 67% OFF: Xiaomi Brand Special Collection